User Guide
This manual covers the day-to-day use of OpenKAT via the web interface. The concepts behind OpenKAT are explained in the “How does OpenKAT work” section. When using OpenKAT for the first time, the on-boarding flow is available, see the section in this chapter.
Web interface
The user interface of OpenKAT consists of five screens, which provide access to the information and main functions of the system:
Crisis Room (main)
KAT catalog
Findings
Objects
Tasks
Members
Settings
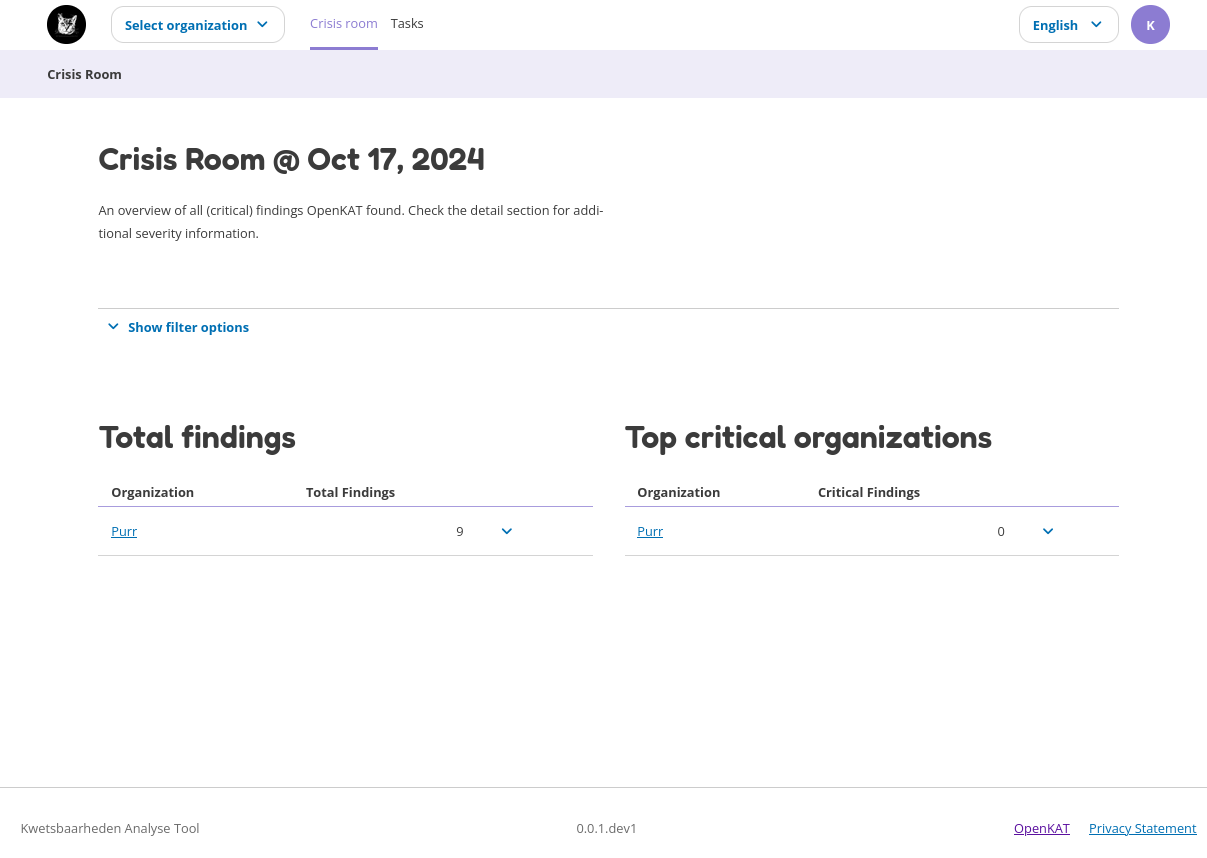
Crisis Room
The Crisis Room provides the overview of all findings, which can be viewed for different times. The time of day can be selected with the option button after which the findings that were applicable at that time become visible.
KAT catalog
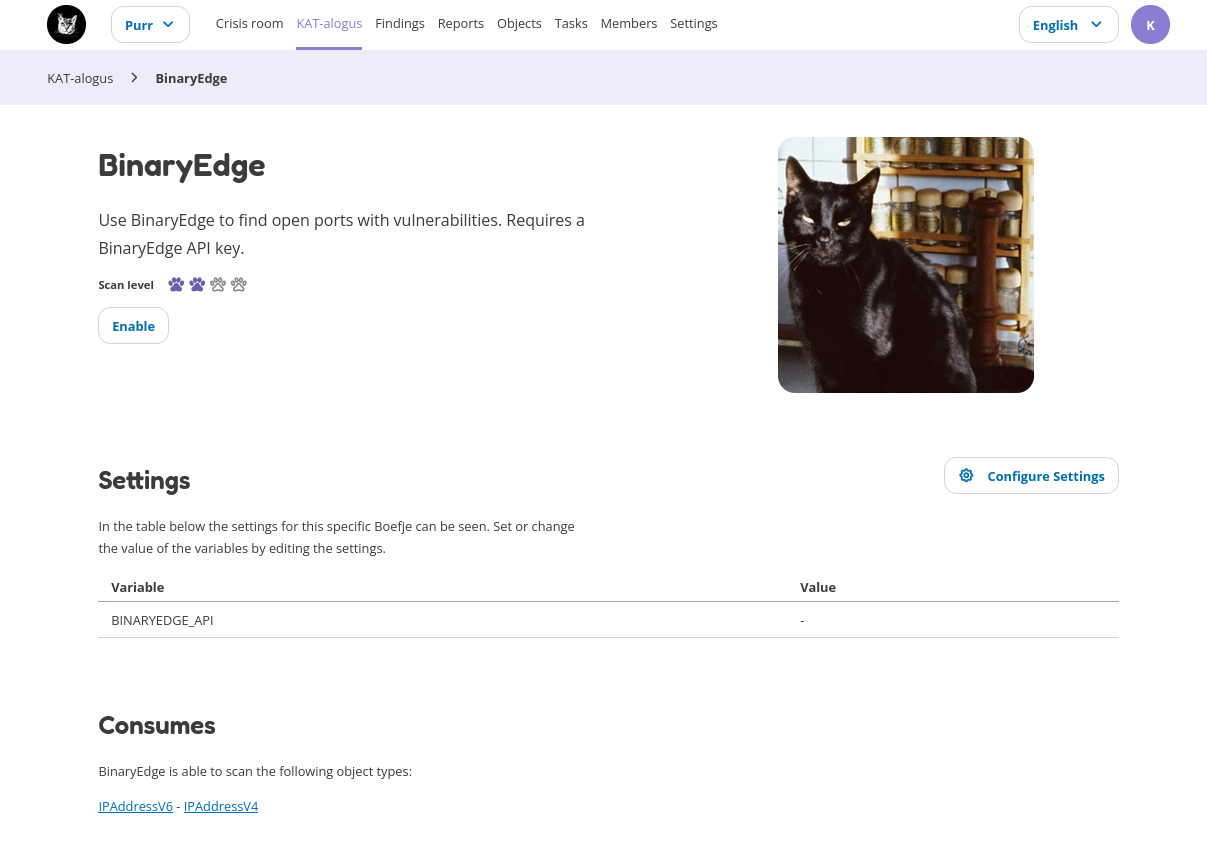
The KAT catalog contains all the tools that this instance of KAT has access to, all the boefjes and normalizers. Click on a boefje for more information, such as the objects it can search for.
Boefjes can be deployed automatically or manually. New boefjes can be added by the administrator, either locally or by adding an external KAT catalog in Rocky’s config file.
Automatic deployment of boefjes depends on the safeguard level, which can be set for each object. If no safeguard is set, it can be derived from a logically connected object for which it is.
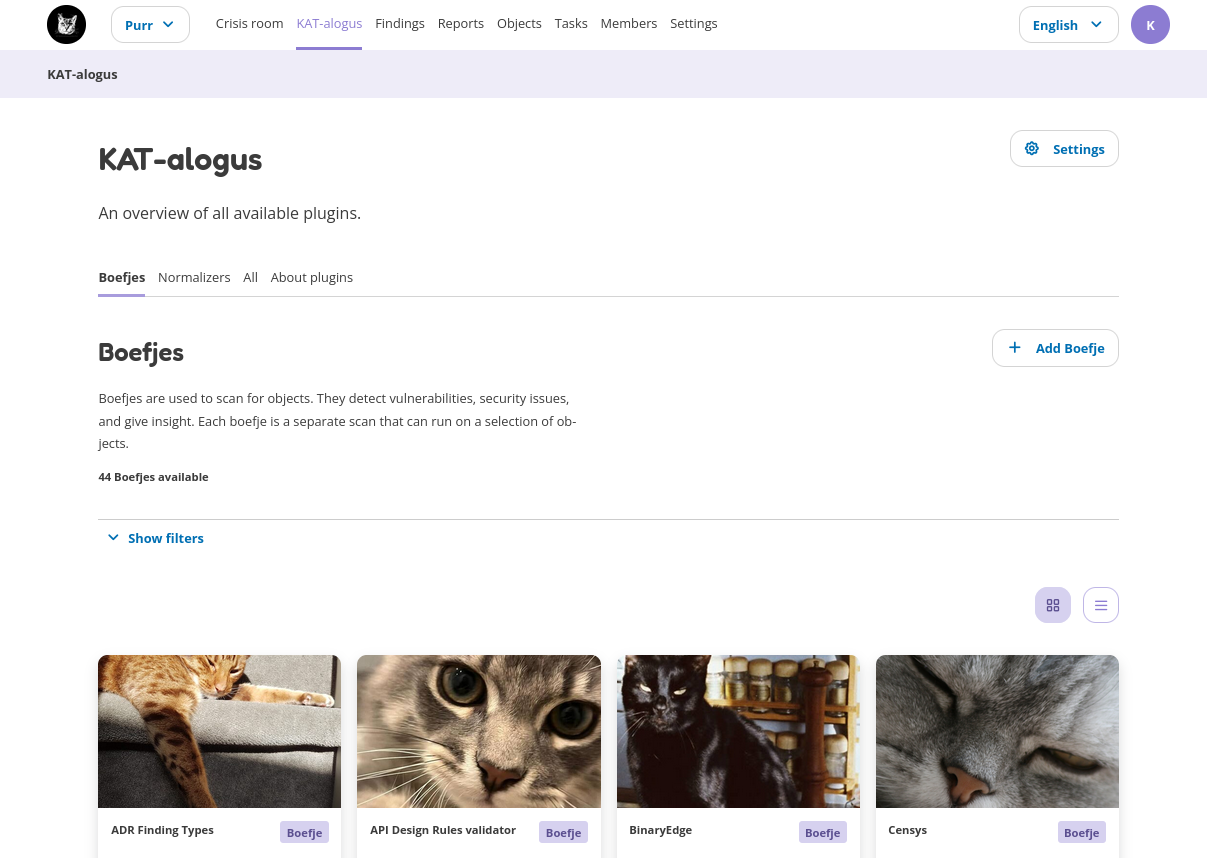
Each boefje has an info page with information about the tools used, the associated objects and the safeguard level required to use the boefje.
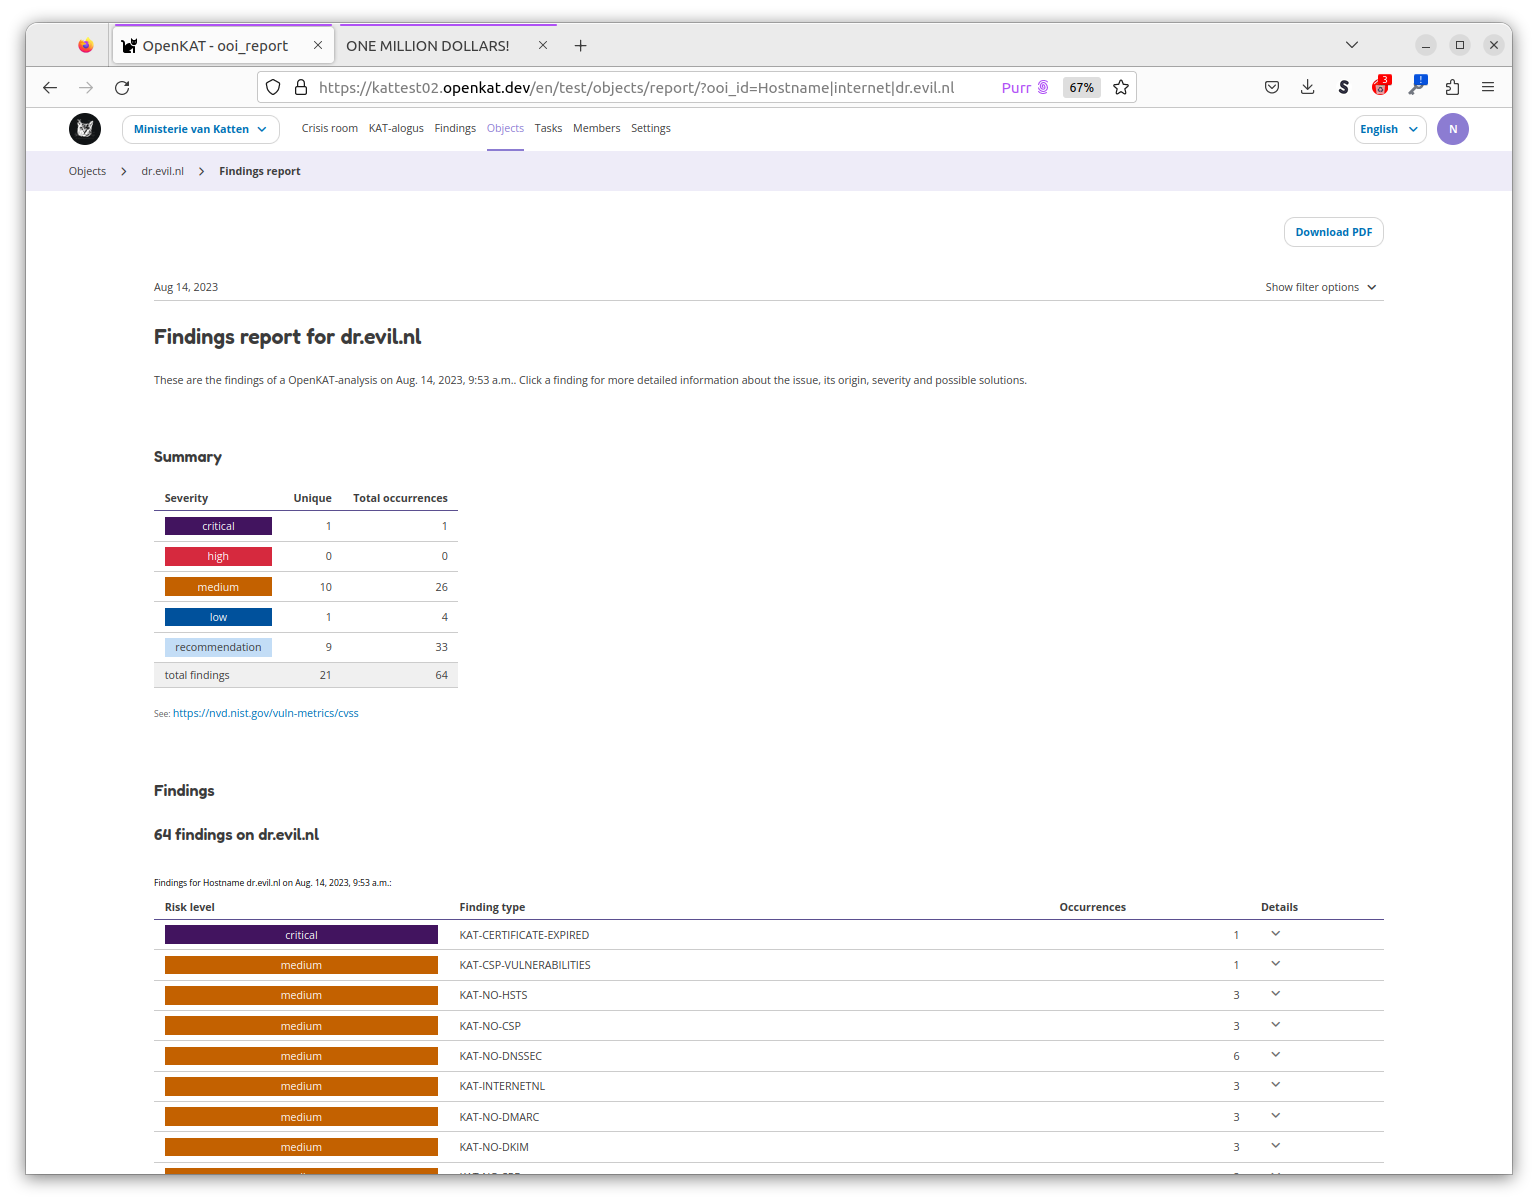
Findings
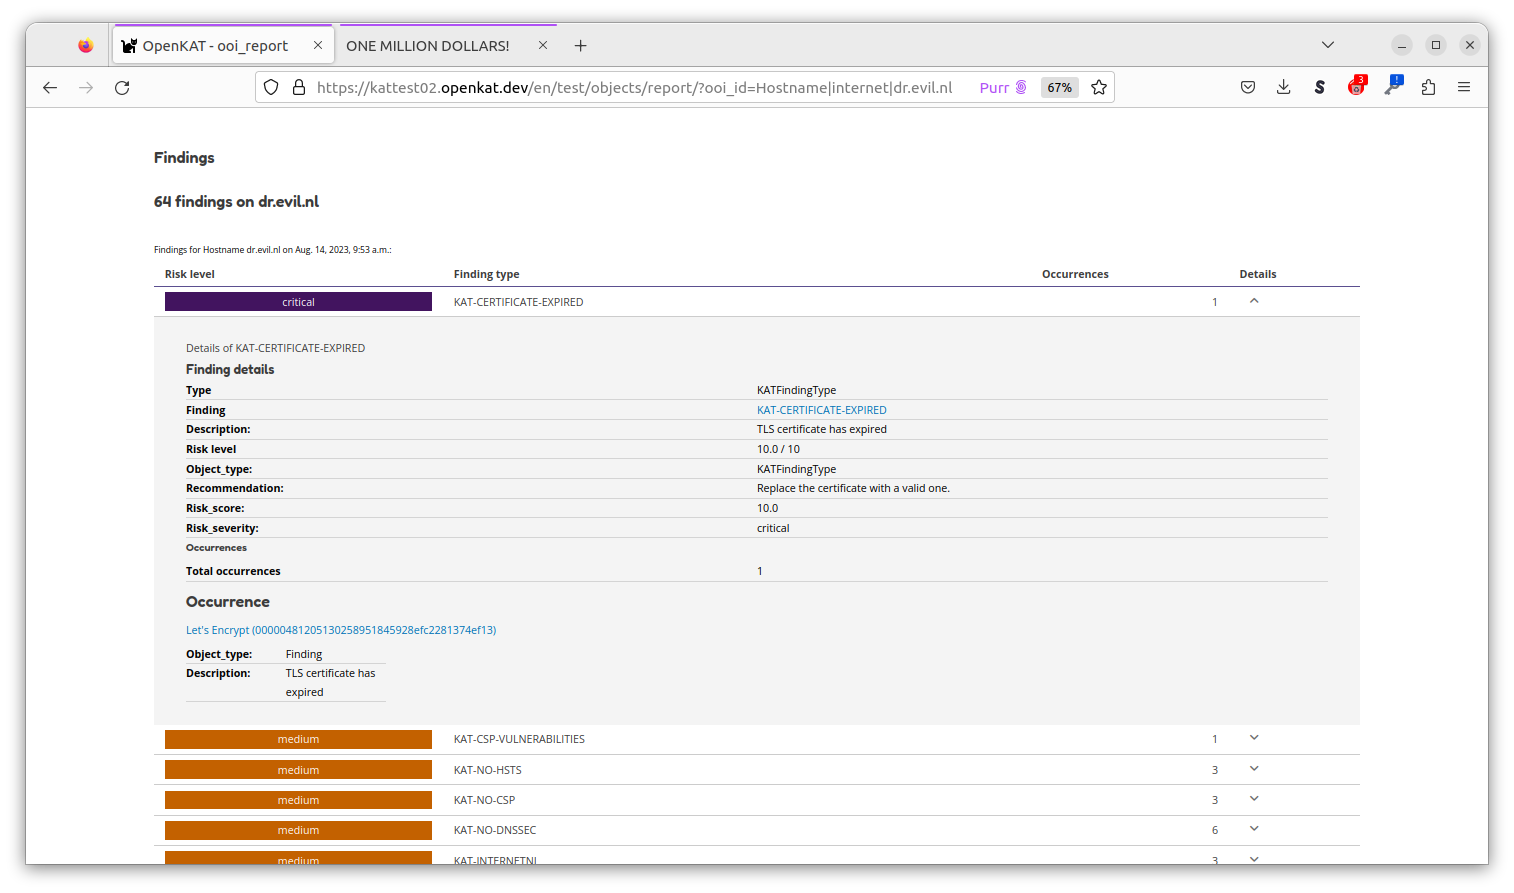
The findings made by KAT can be seen on the Findings page. Use the filters to select the findings. Click on the finding for more information or to generate a report on this finding.
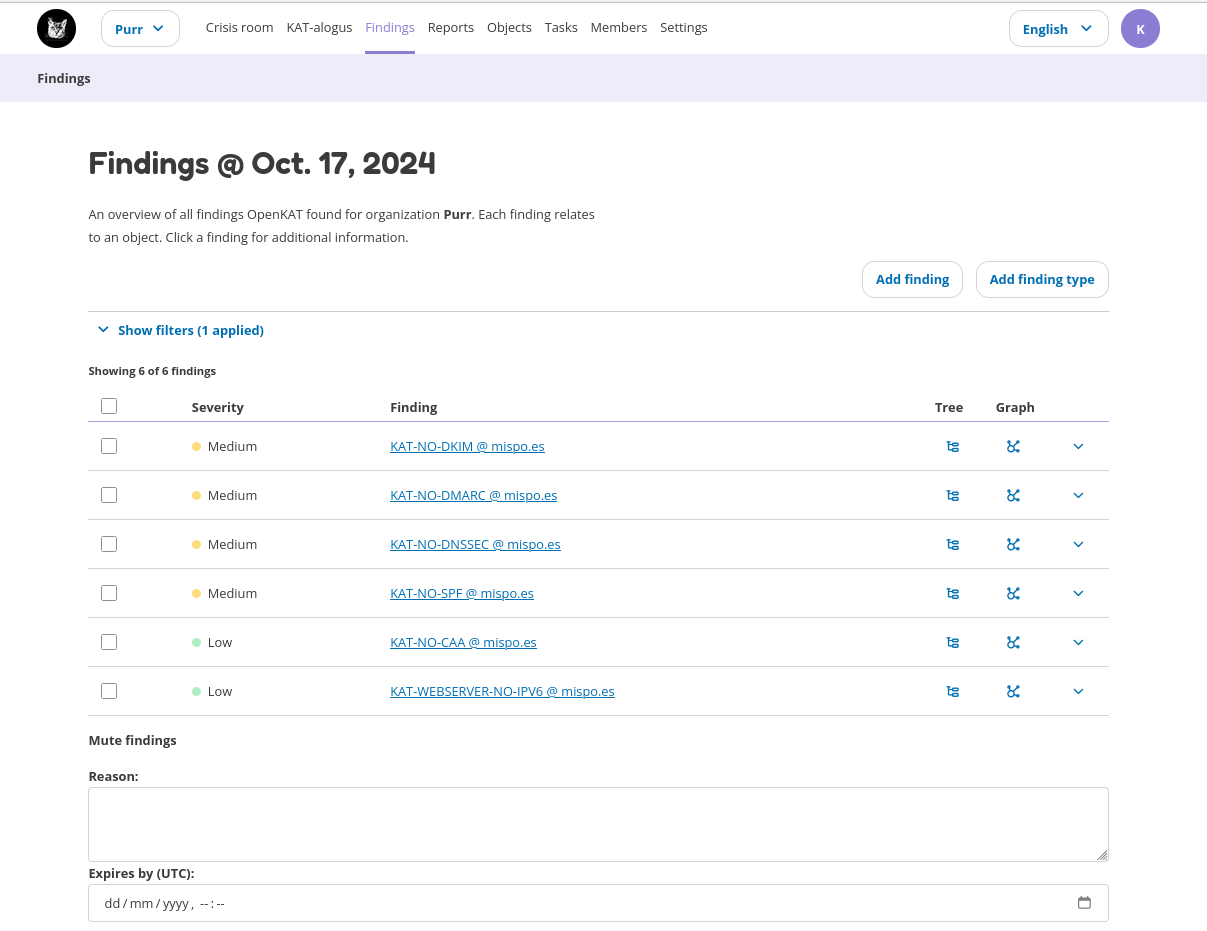
A finding is also an object in the data model, and can also be found on the objects page.
Objects
The Objects page lists all the objects in Octopus. For each object there is information about:
properties
relationship with other objects
findings
level of safeguarding
The objects page is a practical page to find information about a host or system. The objects can be filtered and a report per object can be easily created and exported.
The object detail page provides more information about a specific object, such as the number of findings for this object. More information can be requested per finding:
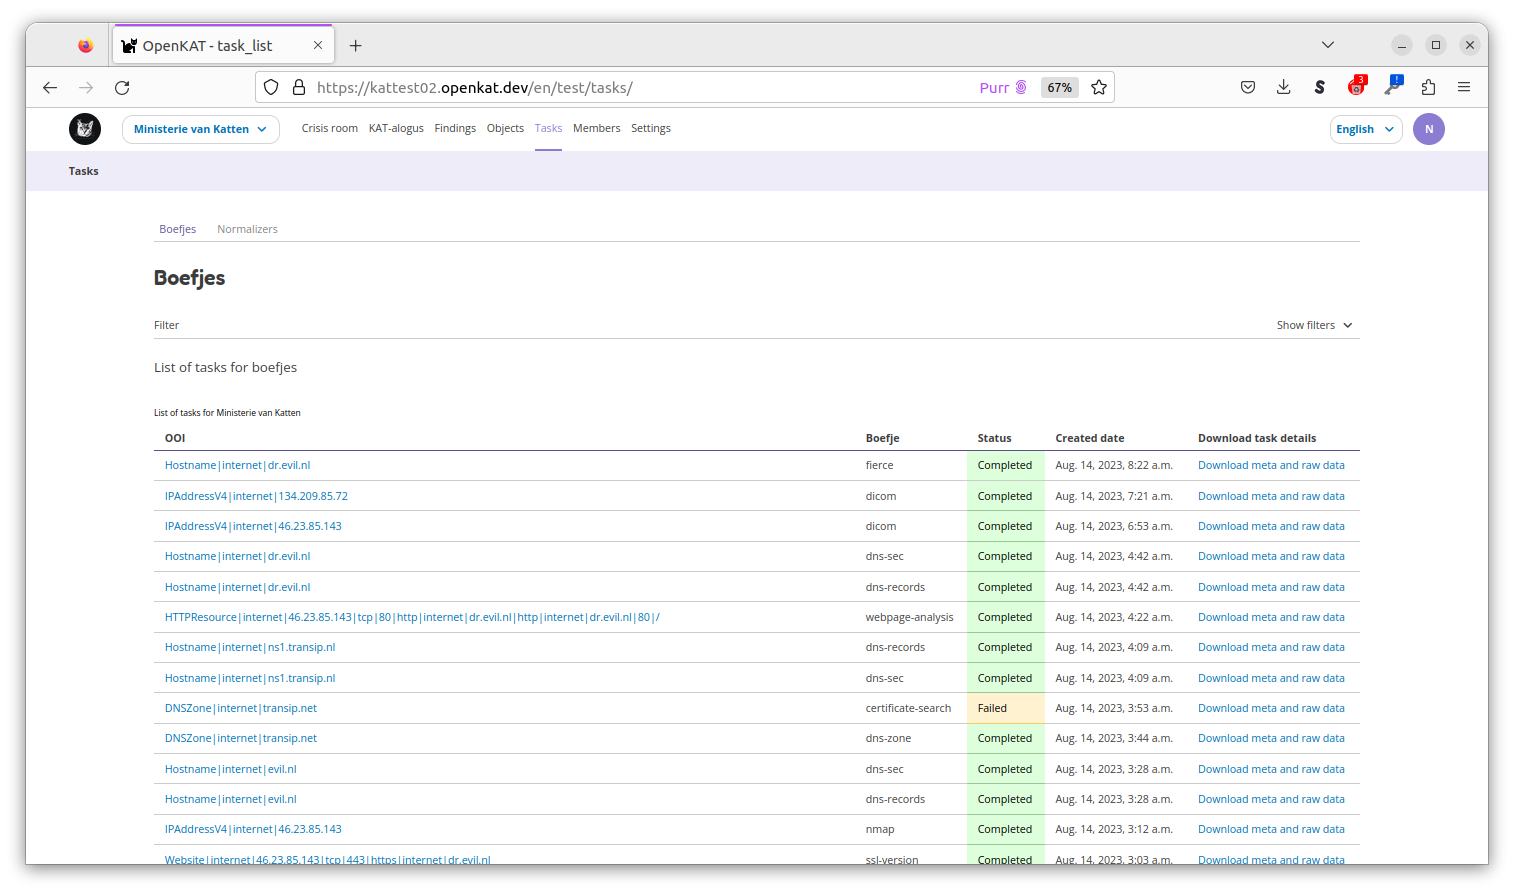
Tasks
The scans of KAT can be found on the Tasks page as tasks. A task is created per boefje and per normalizer, with a status. Per task, the object is displayed and the json with metadata can be downloaded. This includes the hash of the scan performed.
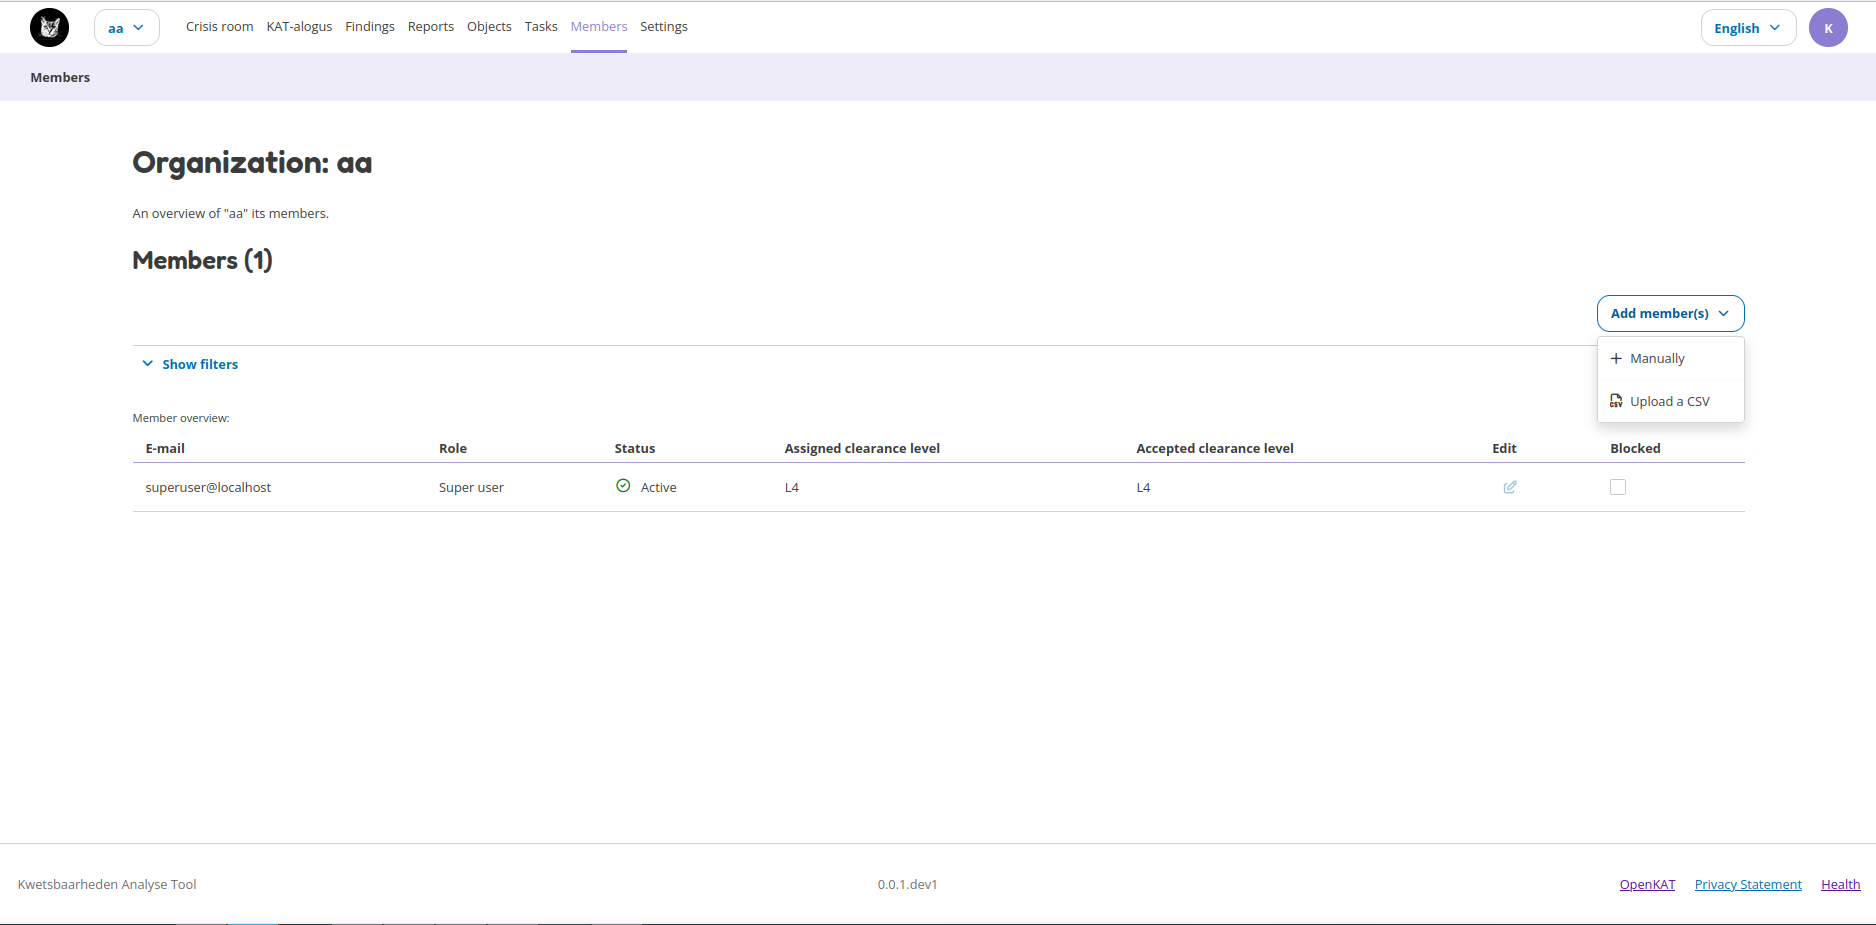
Members
The Members page allows for usermanagement and is visible to users who have the rights to do this.
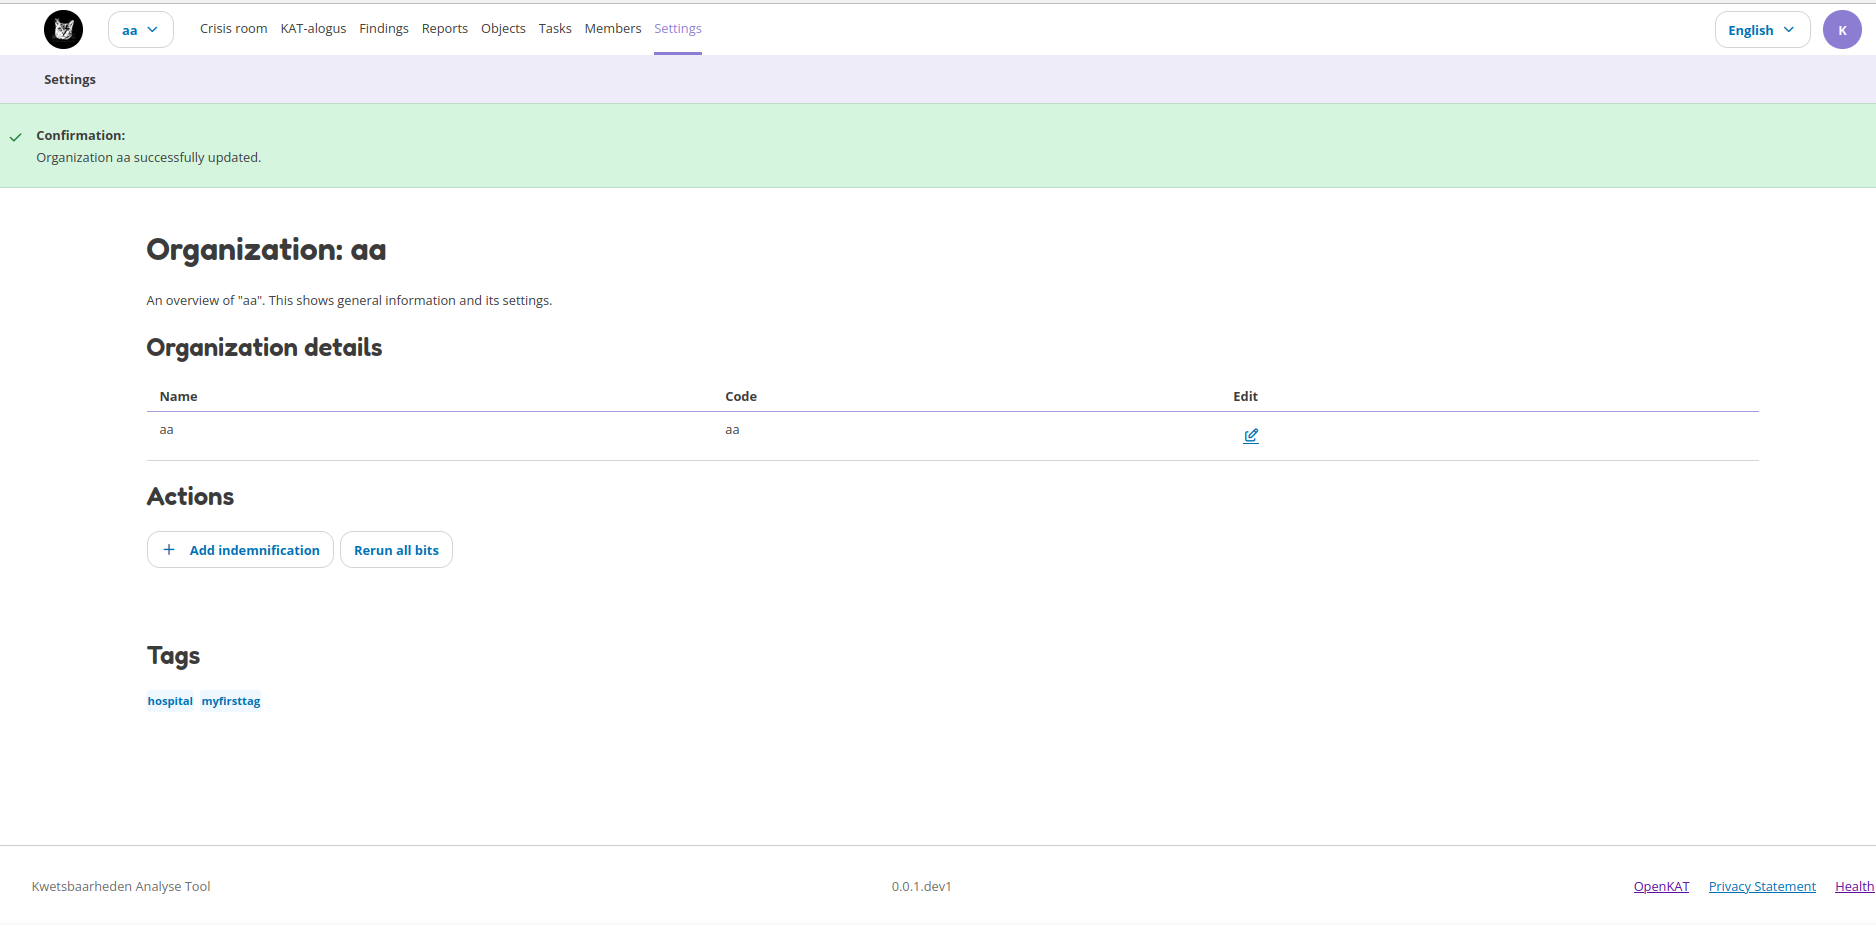
Settings
The Settings page shows general information and its settings:
Organization data
Indemnification
Rerun all bits on the current dataset
Users and organizations
OpenKAT has a superuser, several usertypes and organizations.
Organizations
Organizations own the systems for which KAT is deployed. From KAT, multiple organizations can be monitored simultaneously, each with its own settings. The superuser can add new organizations and each organization has its own users.
Users
OpenKAT knows four types of users: the client, the red team user, the admin and the superuser. In OpenKAT, permissions utilise a stacked model. This means that a higher permission level includes all lower permissions of the lower levels. The client is a ‘read only’ type of user, the red teamer is a researcher who can start scans. The admin is an administrative user who can do user management etc, the superuser has the ability to do everything.
Rights and functions per user type
Action |
USER |
RED TEAM |
ADMIN |
SUPERUSER |
|---|---|---|---|---|
Login |
x |
x |
x |
x |
Can start scans on objects with enough clearance |
x |
x |
x |
x |
Can view reports |
x |
x |
x |
x |
Can start scans on objects with not enough clearance, but the user has enough clearance |
x |
x |
x |
|
Can edit settings of scan tools |
x |
x |
x |
|
Can enable/disable scan tools |
x |
x |
x |
|
Can add objects |
x |
x |
x |
|
Can give clearance to objects up to it’s own clearance level |
x |
x |
x |
|
Can give clearance to users |
x |
x |
||
Can manage organisation members |
x |
x |
||
Can create new account(s) in OpenKAT |
x |
x |
||
Can create new and add, or add existing accounts, to the organisation |
x |
x |
||
Can view users of an organisation |
x |
x |
||
Can edit users of an organisation |
x |
x |
||
Can view organisation details |
x |
x |
||
Can edit organisation details and settings |
x |
x |
||
Can add organisations |
x |
|||
Can start scans on objects regardless of clearance |
x |
|||
Can access Django admin |
x |
User management
Users and organizations can be created in the on boarding flow, in the Web interface or automated. The administrator of the system can create organizations and do user management. The administrator of an organization in turn can create users within the organization. The django interface provides additional capabilities for user management via the command line, for use in an automated deployment and linkage to external user management.
Adding users through a CSV file
Adding multiple users at a time to OpenKAT can be done using a CSV file. To make this work SMTP should be configured.
How does it work?
Select the organization to which the new users will be added. On the members page click the Add member(s) menu and select Upload a CSV. This takes you to the CSV upload page.
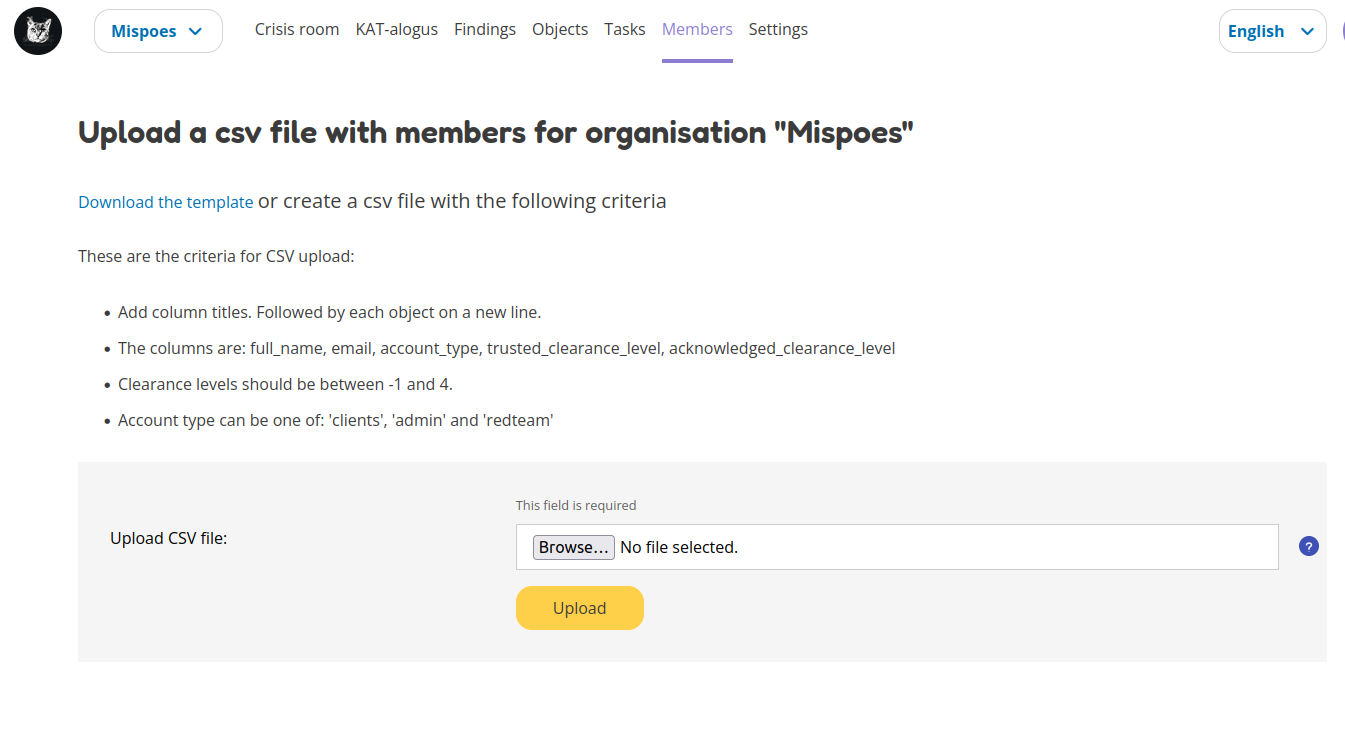
Download the template file, fill in the data of the users you want to add and upload them into the system. The new users will be added to the organization of your choice.

How should I prepare the CSV file?
CSV files are great when they work. Edit the downloaded template file and use a plain texteditor to make sure your CSV file contains exactly what is needed for its purpose.
Each user will have its on line in the CSV file. The template has five columns: full_name, email, account_type, trusted_clearance_level, acknowledged_clearance_level.
User details:
A user is recognized by their full name and email address.
full_name : the full name of the user
email : a working emailadress of the user
User type:
Through the CSV upload you can add the usertypes client, admin and redteam. Read about users and roles in the user section of the documentation
account_type : client, admin or redteam
User clearance:
Clearance levels are related to the scan level of the Boefjes a user is able to dispatch. Read about this in the scan level section of the documentation.
The trusted_clearance_level is the level a user receives from the organization. It is the maximum level available for this user, based on the decision of the admin or superuser. The acknowledged_clearance_level is the level accepted by the user. Both can be added in the CSV file. The accepted level can be changed by the user.
trusted_clearance_level : between -1 and 4
accepted_clearance_level : between -1 and 4
The ability to add the accepted clearance level allows you to copy users from one organization to another, which might be needed on larger installs. The user should have accepted this level at some point, in- or outside OpenKAT.
Warnings
If the CSV file contains data that cannot be parsed OpenKAT will give a warning with the data concerned.
User notification
After the CSV file has been uploaded the users receive a welcome email on their account. The link in this email allows them to create a password for their account. If SMTP is not configured on your install, this will not work.
Content-Type: text/plain; charset="utf-8"
MIME-Version: 1.0
Content-Transfer-Encoding: 7bit
Subject: Verify OpenKAT account on localhost:8000
From:
To: a@bbbb.dl
Date: Thu, 20 Jul 2023 13:34:32 -0000
Message-ID: <168986007241.76.14464090403674779824@af745d470510>

Welcome to OpenKAT. You're receiving this email because you have been added to organization "test" at localhost:8000.
Please go to the following page and choose a new password:

 http://localhost:8000/en/reset/MTY/brn1pk-914a9d550dbb2a5b0269c85f6b667e21/

Sincerely,
The OpenKAT team
API token authentication
Authentication tokens can be created in the admin interface (/admin). The token is created for an user account and will have the same permissions as the user. After creating a token it will display the newly created token once. You need to copy the token immediately, because the token are stored hashed in the database and won’t be visible anymore.
The token can be used by adding the Authorization header with the token to the request:
Authorization: Token f2505ed4d2a51624fe1691c977789ce00dc9886d48271c6c91a25e7dd258c932
For example this will use the token to get the list of organizations:
curl -H 'Authorization: Token f2505ed4d2a51624fe1691c977789ce00dc9886d48271c6c91a25e7dd258c932' http://127.0.0.1:8000/api/v1/organization/
Working with objects
Adding an initial object with an appropriate safeguard puts OpenKAT to work. This can be done in on-boarding, but objects can also be added individually or as CSV files. Objects are also referred to as ‘objects of interest’ or OOI. The object itself contains the actual data: an objecttype describes the object and its logical relations to other objecttypes.
Properties
Objects can be viewed via the ‘Objects’ page in OpenKAT’s main menu. Here are the already created objects with the type and safeguard level for each object. Objects can be added, scanned, filtered and there is an export option.
New objects can be created via the ‘add’ option. This can be done individually or per CSV. The specification of the CSV is included on the page where it can be provided.
Start scan
Based on the object and the clearance, OpenKAT provides an overview of available boefjes. All users can perform a manual scan appropriate to the given safeguard level. The manual scan is accelerated by the scheduler. The results appear as findings with the object.
View Findings
Findings appear on the general findings page, but can also be viewed by object.
Scan levels, clearance & indemnities
Boefjes can collect information with varying intensity. OpenKAT has a system of safeguards to control permission to perform scans and prevent damage to the systems under test.
Boefjes have a scan level
Objects have clearance
Users can receive and accept the ability to give clearance to an object and to start a scan
For each object, the ‘clearance level’ menu indicates how deeply scanning is allowed. Here the user agrees to the risks of the scans and gives permission to store the information gathered on these systems.
The levels used range from level 0 to level 4, from ‘do not scan’ to ‘very intrusive’. Scanning levels are distributed in the data model, either by inheritance or by user statements. The different levels are qualitative in nature. L1 ‘do not touch’ is obvious, but the difference between L2 ‘normal user’ and L3 ‘detectable scanning’ is at the discretion of the developer and administrator. The use of NMAP, for example, falls in between and depends heavily on the arguments the tool brings.
Level |
Description |
|---|---|
L0 |
do not scan |
L1 |
do not touch |
L2 |
normal user |
L3 |
detectable scan |
L4 |
intensive scan |
Indemification by user
The user’s statement counts as an indemnification for scanning a particular object. This obtains permission to scan and store the information. The statement is given at the start of a new scan or specifically for certain objects.
Inheritance
Objects are linked to other objects in the data model. Underlying objects receive the same safeguard level, parent objects a lower level. For example, a hostname has an ip address for which the same safeguard level applies, but it also has a DNS server that may be outside the organization’s domain and receives a lower level.
Extended profiles
L0: Do not scan
The user can explicitly indicate that certain systems should not be scanned. For example, because he is not the owner of these.
L1: Do not touch
OpenSource and passive data collection. For this profile, objects are viewed through various freely available data and sources via the Internet. These can be sources that do not have explicit permission (e.g. LinkedIn, DNS, leaked password databases). The goal here is to detect public information that could be a risk to the client: information that could be misused by an attacker in a targeted attack.
Examples of sources/tools used:
Shodan (via API)
HaveIbeenPnwed
DNS
L2: Touching at the normal user level
Targeted scans, limited intrusive. Scan will be dosed and skip known sensitive scans. The scanned target usually continues to function without problems.
Example of scanning tools useful for this purpose:
Nmap
Nikto
Burp passive scanner
L3: Detectable scan
This scan will be more intrusive: connect to services to find out versions, try to log in with commonly used (default) login credentials, automated testing of found vulnerabilities whether they are vulnerable, more intensive guessing of urls and more intensive crawling of web pages.
A greater number of scans will be performed, resulting in a spike in data traffic. The infrastructure may not be designed for this.
Example of useful scanning tools and methods:
Nessus, Nexpose, Acunetix
Burp Intruder, active scanner
L4: Intensive scan
The premise of the test profile is to verify whether an attacker can exploit vulnerabilities to give himself more extensive access to the tested environment. Thus, known exploit code is applied in this level.
Bits
Bits are businessrules that assess objects. These can be disabled or enabled using environment variables. The parameters of a Bit can be configured using config objects, which are explained in detail in the business rule section of the introducion.
Almost all bits are enabled by default and be disabled by adding the bit to BITS_DISABLED. The disabled bits can be enabled using BITS_ENABLED. For example:
BITS_ENABLED='["bit1","bit2"]'
BITS_DISABLED='["bit3"]'
Note that if you enable a bit that was previously enabled the bit won’t be automatically run for every object it should have run on, but only when it is triggered again after a new scan or other bit that has run. When a bit that was previously enabled is disabled the resulting objects from that bit will also not be automatically removed. Only when the bit triggers instead of running the bit the resulting OOIs of the previous run will be deleted. This also means that if the bit isn’t triggered the old objects will not be removed.
Reports
OpenKAT displays all findings in the crisis room, the entry point for all current information from the system. In addition, OpenKAT can create thematic reports and display findings per object. The reports are available in the front end and as PDF, based on a LaTeX parser. The organization’s house style can also be incorporated. It is also possible to link to other reporting and alerting systems.

My first scan
If you are using OpenKAT for the first time you can use the on-boarding flow. The on-boarding flow helps you through the full cycle of OpenKAT. After following this flow, you will have a functioning OpenKAT installation running a first set of scans. By adding more objects, releasing and selecting boefjes, you can find out more information and perform analysis.
The on-boarding flow uses the following steps to get you going:
Create admin account with 2FA
The administrator account in the front end uses a login, password and two-factor authentication with one-time passwords. The code for creating the one time passwords is available as a string and as a QR code.
Organization creation
The organization is the entity that “owns” the systems to be scanned and on whose behalf the user can provide an indemnification. From an OpenKAT installation, multiple organizations can be scanned, each with its own settings and its own objects. Organizations can be created automatically from release 1.5 on the basis of an API, which is relevant for larger systems.
User creation
Users in OpenKAT are the red team and the read-only user.
Choosing a report (“what question do you ask OpenKAT?”)
OpenKAT starts with a question, for example about the situation around the DNS configuration of a particular domain. For this, choose the relevant report.
Creating an object (‘what should OpenKAT look at first?’)
Add the objects that OpenKAT can take as a starting point for the scan, for example a hostname.
Specify clearance level (‘how intensive should OpenKAT search?’)
Specify the intensity of the scan: how intensely may OpenKAT scan? The heavier, the greater the impact on the system being scanned.
Select boefjes and have OpenKAT scan them
Based on the report, object and safeguard, select the relevant boefjes for your first scan and run the scan.
View results: in the web interface or as a PDF report
The scan is an ongoing process, looking for information based on derivation and logical connections in the data model. The results of the scan appear over time, any findings can be viewed by object, at Findings and in the Crisis Room. In each context, reports can also be generated.
Trusted timestamps in OpenKAT
OpenKAT can use a trusted timestamp provider for the raw data in Bytes. This timestamp provider needs to conform to rfc3161. It can be set in the Bytes .env file.
About the protocol
The RFC3161 timestamp protocol is a simple and effective way to add a timestamp to data. The data concerned is hashed to provide an identifier. The hash is uploaded and timestamped by the server. As long as you trust the server, you can prove the data existed at the point in time indicated by the server.
Wikipedia has a nice explanation of the protocol, including lovely images:
Available timestamp servers
The .env file in Bytes specifies a time stamp server. The default specification is empty in order to prevent you from querying an external server without prior knowledge. OpenKAT will sign the data itself but for proper timestamping an external server is required. Find a list of public servers here.
Add the timestamp server address and the certificate to the .env file in Bytes and restart OpenKAT. It will automatically use the specified server for all new data.
How to verify a timestamp?
The verification process involves the raw data, the hash from it and the timestamp that was set using this hash. Using the following steps we can verify the data:
download the raw data
verify the hash
check the timestamp
Download the raw data
The raw data of your object can be found in the object page or task that created it. Download the zip file, open it and locate the raw_meta json. Inside are the hash of the data and the retrieval link for the timestamp. In this document we will check an object timestamped with the freetsa.org server, so parts of this example might be different depending on the service you have configured.
Raw data filename (example):
[example file name]JSON filename (example):
raw_meta_[example file name].json
Verify the hash
Check the hash of the file using the timestamp:
#!/bin/bash

timestamp=$(jq -r ".boefje_meta.ended_at" raw_meta_[example file name].json | python3 -c "import datetime, sys; print(datetime.datetime.fromisoformat(sys.stdin.readline().strip()).timestamp())")

cat [example file name] <(echo $timestamp) | tr -d '\n' | shasum -a 512
The result of this should deliver a hash exactly similar to the one in the JSON.
Verify the timestamp
Check the timestamp using openssl tools. Add the hash and retrieval link to small files and compare them to the certs from the timestamp service:
#!/bin/bash

jq -r ".secure_hash" raw_meta_[example file name].json | tr -d '\n' > data_file
jq -r ".hash_retrieval_link" raw_meta_[example file name].json | base64 -d > time_stamp_token
wget https://freetsa.org/files/tsa.crt
wget https://freetsa.org/files/cacert.pem

openssl ts -verify -in time_stamp_token -token_in -data data_file -CAfile cacert.pem -untrusted tsa.crt``
The output of these commands is quite verbose, which makes it possible to follow the steps. If everything is correct and the data has not been changed, you will receive a Verification: OK as result, confirming the data is correct.
Automation of the verification process
OpenKAT has been created to automate tedious tasks such as this one. We like to include an automated verification process for objects that includes the entire chain of information, with nice green checkmarks. It is on the roadmap, if you want to contribute to it you are most welcome! Get in touch through meedoen@openkat.nl.